
FreeFileSync Open Source File Synchronization
It looks like an ad blocker has blocked the ads.
 The FreeFileSync project is 100% dependent on ad revenue and donations to stay alive. Instead of the ads, and
after FreeFileSync has proven useful to you, please think about supporting with a donation.
The FreeFileSync project is 100% dependent on ad revenue and donations to stay alive. Instead of the ads, and
after FreeFileSync has proven useful to you, please think about supporting with a donation.
The FreeFileSync project is 100% dependent on ad revenue and donations to stay alive. Instead of the ads, and
after FreeFileSync has proven useful to you, please think about supporting with a donation.
FreeFileSync User Manual:
#Quick Start
Command Line
Comparison Settings
Daylight Saving Time
Exclude Files
Expert Settings
External Applications
Macros
Performance
RealTimeSync
RTS: Run as Service
Schedule Batch Jobs
Scripting
Synchronization Settings
(S)FTP Setup
Tips and Tricks
Variable Drive Letters
Versioning
Volume Shadow Copy
Schedule Batch Jobs
- Create a batch job in FreeFileSync by selecting: Menu → File → Save as a batch job...
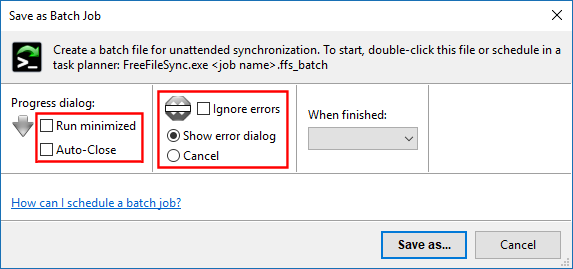
- By default, FreeFileSync displays a progress dialog during synchronization and
will wait while the summary dialog is shown.
If the progress dialog is not needed, enable the Run minimized checkbox and
also set Auto-Close if you want to skip the summary dialog at the end.
Note
You can make the progress dialog visible at any time during synchronization by double-clicking the FreeFileSync icon in the notification area, if it's initially hidden.
- To prevent error or warning messages from delaying synchronization when no user is present,
either enable Ignore errors or set Cancel to halt at the first error.
- You can start the FreeFileSync batch job by double-clicking the .ffs_batch file
or by scheduling it using your operating system's scheduler:
Note
Enable Auto-Close and Ignore errors/Cancel if the .ffs_batch file is scheduled to run under a different user account. With no one there to close the results dialog manually, the task would hang indefinitely.
Enable Auto-Close and Ignore errors/Cancel if the .ffs_batch file is scheduled to run under a different user account. With no one there to close the results dialog manually, the task would hang indefinitely.
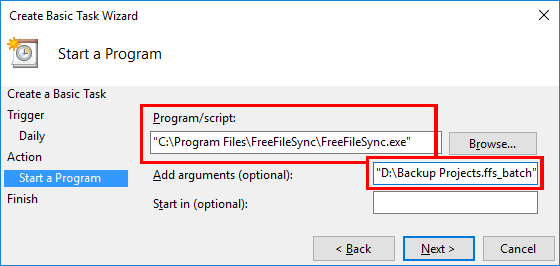
Windows: Task Scheduler
- Open the Task Scheduler either via the start menu, or enter taskschd.msc in the run dialog (keyboard shortcut: Windows + R).
- Create a new basic task and follow the wizard steps.
- Make Program/script point to the location of FreeFileSync.exe and insert the
.ffs_batch file into Add arguments.
- Put quotation marks around paths with spaces to prevent misinterpretation as multiple non-existent paths.
e.g. like "D:\Backup Projects.ffs_batch"
Note
- Program/script always needs to point to an executable file like FreeFileSync.exe even when the .ffs_batch file association is registered. If an .ffs_batch file was entered instead, the task would return with error code 2147942593 (0x800700C1), "%1 is not a valid Win32 application".
- If you schedule FreeFileSync to run under a different user account, note that the configuration file
GlobalSettings.xml will also be read from a different path,
C:\Users\<username>\AppData\Roaming\FreeFileSync,
or in the case of the SYSTEM account from
C:\Windows\System32\config\systemprofile\AppData\Roaming\FreeFileSync.
You can force usage of a particular GlobalSettings.xml file by passing it as a Command Line parameter.
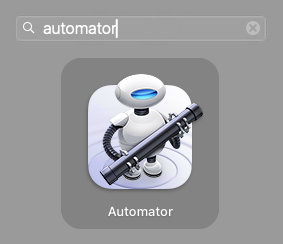
macOS: Automator and Calendar
- Open Launchpad and launch Automator.
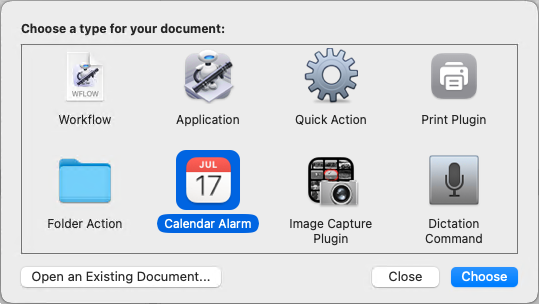
- Create a new Calendar Alarm.
- Drag and drop the .ffs_batch file on the workflow panel.
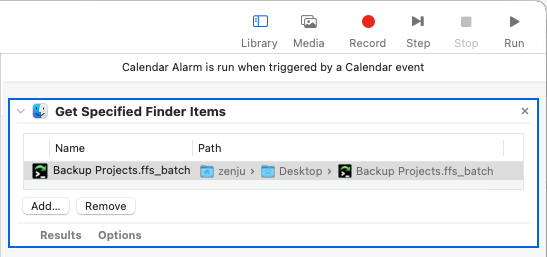
- Double-click Actions / Files & Folders / Open Finder Items to add it to the workflow.

- Go to File → Save... and save the Automator job.

- The Calendar app will open automatically with the Automator job scheduled for today.
You can now select a different time for synchronization or make it a recurring task.

Linux/macOS: Cron Job
Cron runs arbitrary commands at specified intervals.To schedule a FreeFileSync batch job, construct a command line for cron consisting of the path to the FreeFileSync executable followed by the path to the FreeFileSync batch job, e.g.
/opt/FreeFileSync/FreeFileSync "/home/zenju/Backup Projects.ffs_batch"
macOS: The executable is located inside the application package, e.g. for an all-users installation:
/Applications/FreeFileSync.app/Contents/MacOS/FreeFileSync
Open cron's table of scheduled jobs for editing:
crontab -e

Note
Cron might use a text editor you are not familiar with. A different editor can be selected via the "EDITOR" environment variable, e.g. nano, or gedit:
Cron might use a text editor you are not familiar with. A different editor can be selected via the "EDITOR" environment variable, e.g. nano, or gedit:
EDITOR=nano crontab -e
Example: Start crontab using the nano text editor
Each crontab line begins with conditions for recurring execution of the command line that follows. Cron's basic concept is to run a command every minute unless constraints are applied:
To run every hour, set the minute to a fixed value:
| # | minute | hour | day of month | month | day of week |
| 0 | * | * | * | * |
To run once every day, set both minute and hour; e.g. run daily at 17:00:
| # | minute | hour | day of month | month | day of week |
| 0 | 17 | * | * | * |
Multiple items are separated by ",", ranges specified using "-", and interval steps by "/".
| # | minute | hour | day of month | month | day of week |
| */10 | 9-17 | * | * | mon,fri |
Example: Run every 10 minutes but only from 9:00 to 17:00 and only on Monday and Friday
To run once after each system startup, use alternative syntax "@reboot":
@reboot sleep 60; /opt/FreeFileSync/FreeFileSync "/home/zenju/Backup Projects.ffs_batch"
Example: Start synchronization 60 seconds after system reboot
Troubleshooting
If there's no visible activity or synchronization log generated when Cron runs, redirect the standard output and error streams to a log file.
This will allow you to confirm whether Cron executed, and whether any diagnostic information was emitted.
If there's no visible activity or synchronization log generated when Cron runs, redirect the standard output and error streams to a log file.
This will allow you to confirm whether Cron executed, and whether any diagnostic information was emitted.
/opt/FreeFileSync/FreeFileSync "/home/zenju/Backup Projects.ffs_batch" >> /home/zenju/Desktop/cron_log.txt 2>&1
Example: Standard output is appended to cron_log.txt via >>.
2>&1 redirects the error stream(2) to standard output stream(1).
2>&1 redirects the error stream(2) to standard output stream(1).